


Paper lantern decor is one of those party styling secrets that instantly makes a space feel elevated, festive, and thoughtfully designed.
Whether you’re decorating for a birthday, wedding, holiday party, or special celebration, lanterns add color, texture, and visual interest while keeping the space open and inviting.
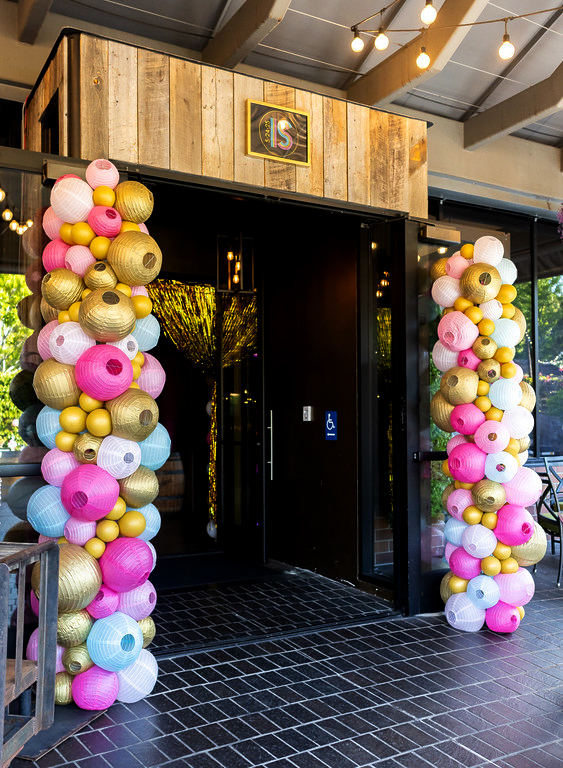
For my friend's daughter's Bat Mitzvah celebration, I created DIY paper lantern pillars to frame the entrance of the venue—and they completely transformed the space from restaurant to magical celebration wonderland.
They’re bold, sculptural, and surprisingly straight-forward to create!
If you’re looking for a paper lantern decor idea that delivers mega impact, this is it!
LEARN HOW TO MAKE THESE DIY PAPER LANTER PILLARS

Why Paper Lantern Decor ROCKS
Paper lanterns are lightweight, affordable, and incredibly versatile. When grouped together—especially at different sizes—they add colorful dimension to a space that feels personalized and high-end.
These lantern pillars work especially well because they:
- Add instant height and drama
- Frame entrances and walkways beautifully
- Work for indoor or covered outdoor events
- Are fully customizable for color, size, and theme
Supplies YOU NEED
Paper Lantern Decor
- 80-100 paper lanterns per pillar in assorted sizes and colors (I used 4", 6", 8", 10" and 12" paper lanterns)
- Optional LED lantern lights (If your event is at night, place these inside each lantern and your pillars will glow.)
Structure & Support
- Step and repeat adjustable display poles (You'll need one for each pillar, look for one with a narrow base.)
- Chicken wire
- Wire cutters
Assembly Tools
- 4" zip ties (you’ll use more than you think)
- Scissors
Finishing Touches
- Small balloons (5–7 inch), metallic or neutral
- Balloon pump

How to Make DIY Paper Lantern Pillars
Step 1: Create the Base
Start by adjusting your step-and-repeat poles to the height you want the pillars. These will sit underneath the lanterns and remain completely hidden, so stability is key.
This base gives your paper lantern decor its structure and makes the pillars sturdy so they won't topple over in the middle of your party!
Step 2: Build the Frame
- Cut chicken wire to your desired length (a few inches taller than your pole height)
- Roll it into tall cylindrical shape.
- Secure the seam with zip ties
(The chicken wire I used was 16.5" wide, so when I rolled and tied it it created a cylinder with about a 5.25" diameter.)
Once assembled, slide the chicken wire pillar over the step-and-repeat pole. This becomes the invisible framework that holds everything together.
This is what the base will look like with the chicken wire rolled, zip-tied, and slipped onto the pole:


Step 3: Attach the Lanterns
Starting at the bottom, begin zip-tying lanterns directly to the chicken wire.
- Mix sizes for an organic look
- Rotate around the pillar as you work
- Keep lanterns close but not perfectly uniform
- Take note of color placement if you're using multiple colors
- Trim the zip tie after you secure each lantern to keep the tie's end from poking out and looking untidy.
You'll likely see the chicken wire and pole in some spots at this early stage. Don't worry, the small balloons will fill in these gaps at the end!

Step 4: Fill in Gaps
Once the lanterns are attached all the way to the top of your pillar, it's time to fill in the gaps with the balloons.
Inflate the small balloons and zip-tie them into open spaces. This adds texture, depth, and a polished finish that makes the whole pillar feel complete.
Balloons are so easy and affordable and fill these gaps perfectly. You could also fill these spaces with flowers or greenery if your budget allows!

Step 5: Transport the Pillars
To move your paper lantern pillars safely, transport the chicken wire frames separately from the step-and-repeat poles.
The lanterns are lightweight but delicate, so load the pillars on their sides in the back of an SUV or van.
You might wedge them in place with blankets or pillows to keep them from shifting, and definitely avoid stacking anything on top of them.
If you’re adding lighting or florals/botanicals, wait until you arrive at the venue—this makes transport easier and helps everything look fresh.
Once on site, simply slide the lantern-covered frames back over the poles for quick, stress-free setup!
Step 6: Place and Style
Position your finished paper lantern pillars on either side of an entrance, doorway, or walkway.
This creates an instant focal point and sets the tone for the event the moment guests arrive.
The lantern pillars make an ideal backdrop for photo opportunities as well!

Paper Lantern Styling Ideas
- All-white lanterns for weddings or showers
- Neutral lanterns with metallic balloons for elegant events
- Bright colors for birthdays or kids’ parties
- Soft pastels for spring celebrations
- Add greenery or florals for an organic, modern twist

Try THIS DIY FOR YOUR NEXT SPECIAL OCCASION!
If you’re searching for a paper lantern decor idea that feels bold, creative, and truly memorable, these DIY paper lantern pillars are worth the effort.
They make a statement without feeling overdone and can be reused, restyled, and adapted for future events.
Guests can’t help but ask, ‘Where did those come from?’—and are amazed when they learn you made them!
Have fun making these paper lantern DIY pillars!
Looking for more DIY PARTY DECOR IDEAS?
MORE POSTS YOU'LL LOVE
This post may contain affiliate links, which means I'll receive a small commission if you purchase through my link. Read the full disclosure.


